
Machine Learning Implementation in Flutter
Machine learning is basically the process of training a piece of software called a model, which is useful for learning patterns in a dataset. This model can then be used to predict data that has never been recognized before.
Later the finished model can be exported and after exporting it can be implemented to flutter. Here in this article us Explain how to implement machine learning in Flutter.
How to Create a Model
There are many ways to create your own machine learning model, you can create it using python in anaconda navigator, google colab But for those of you who have never made a model before, there is a more practical way to make a model, namely in teachablemachine.
For this time we will make a model in teachablemachine.


Create an image project
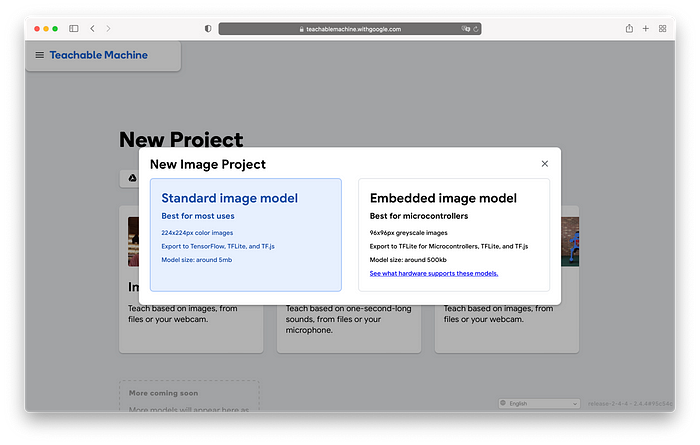
Choose a standard image model

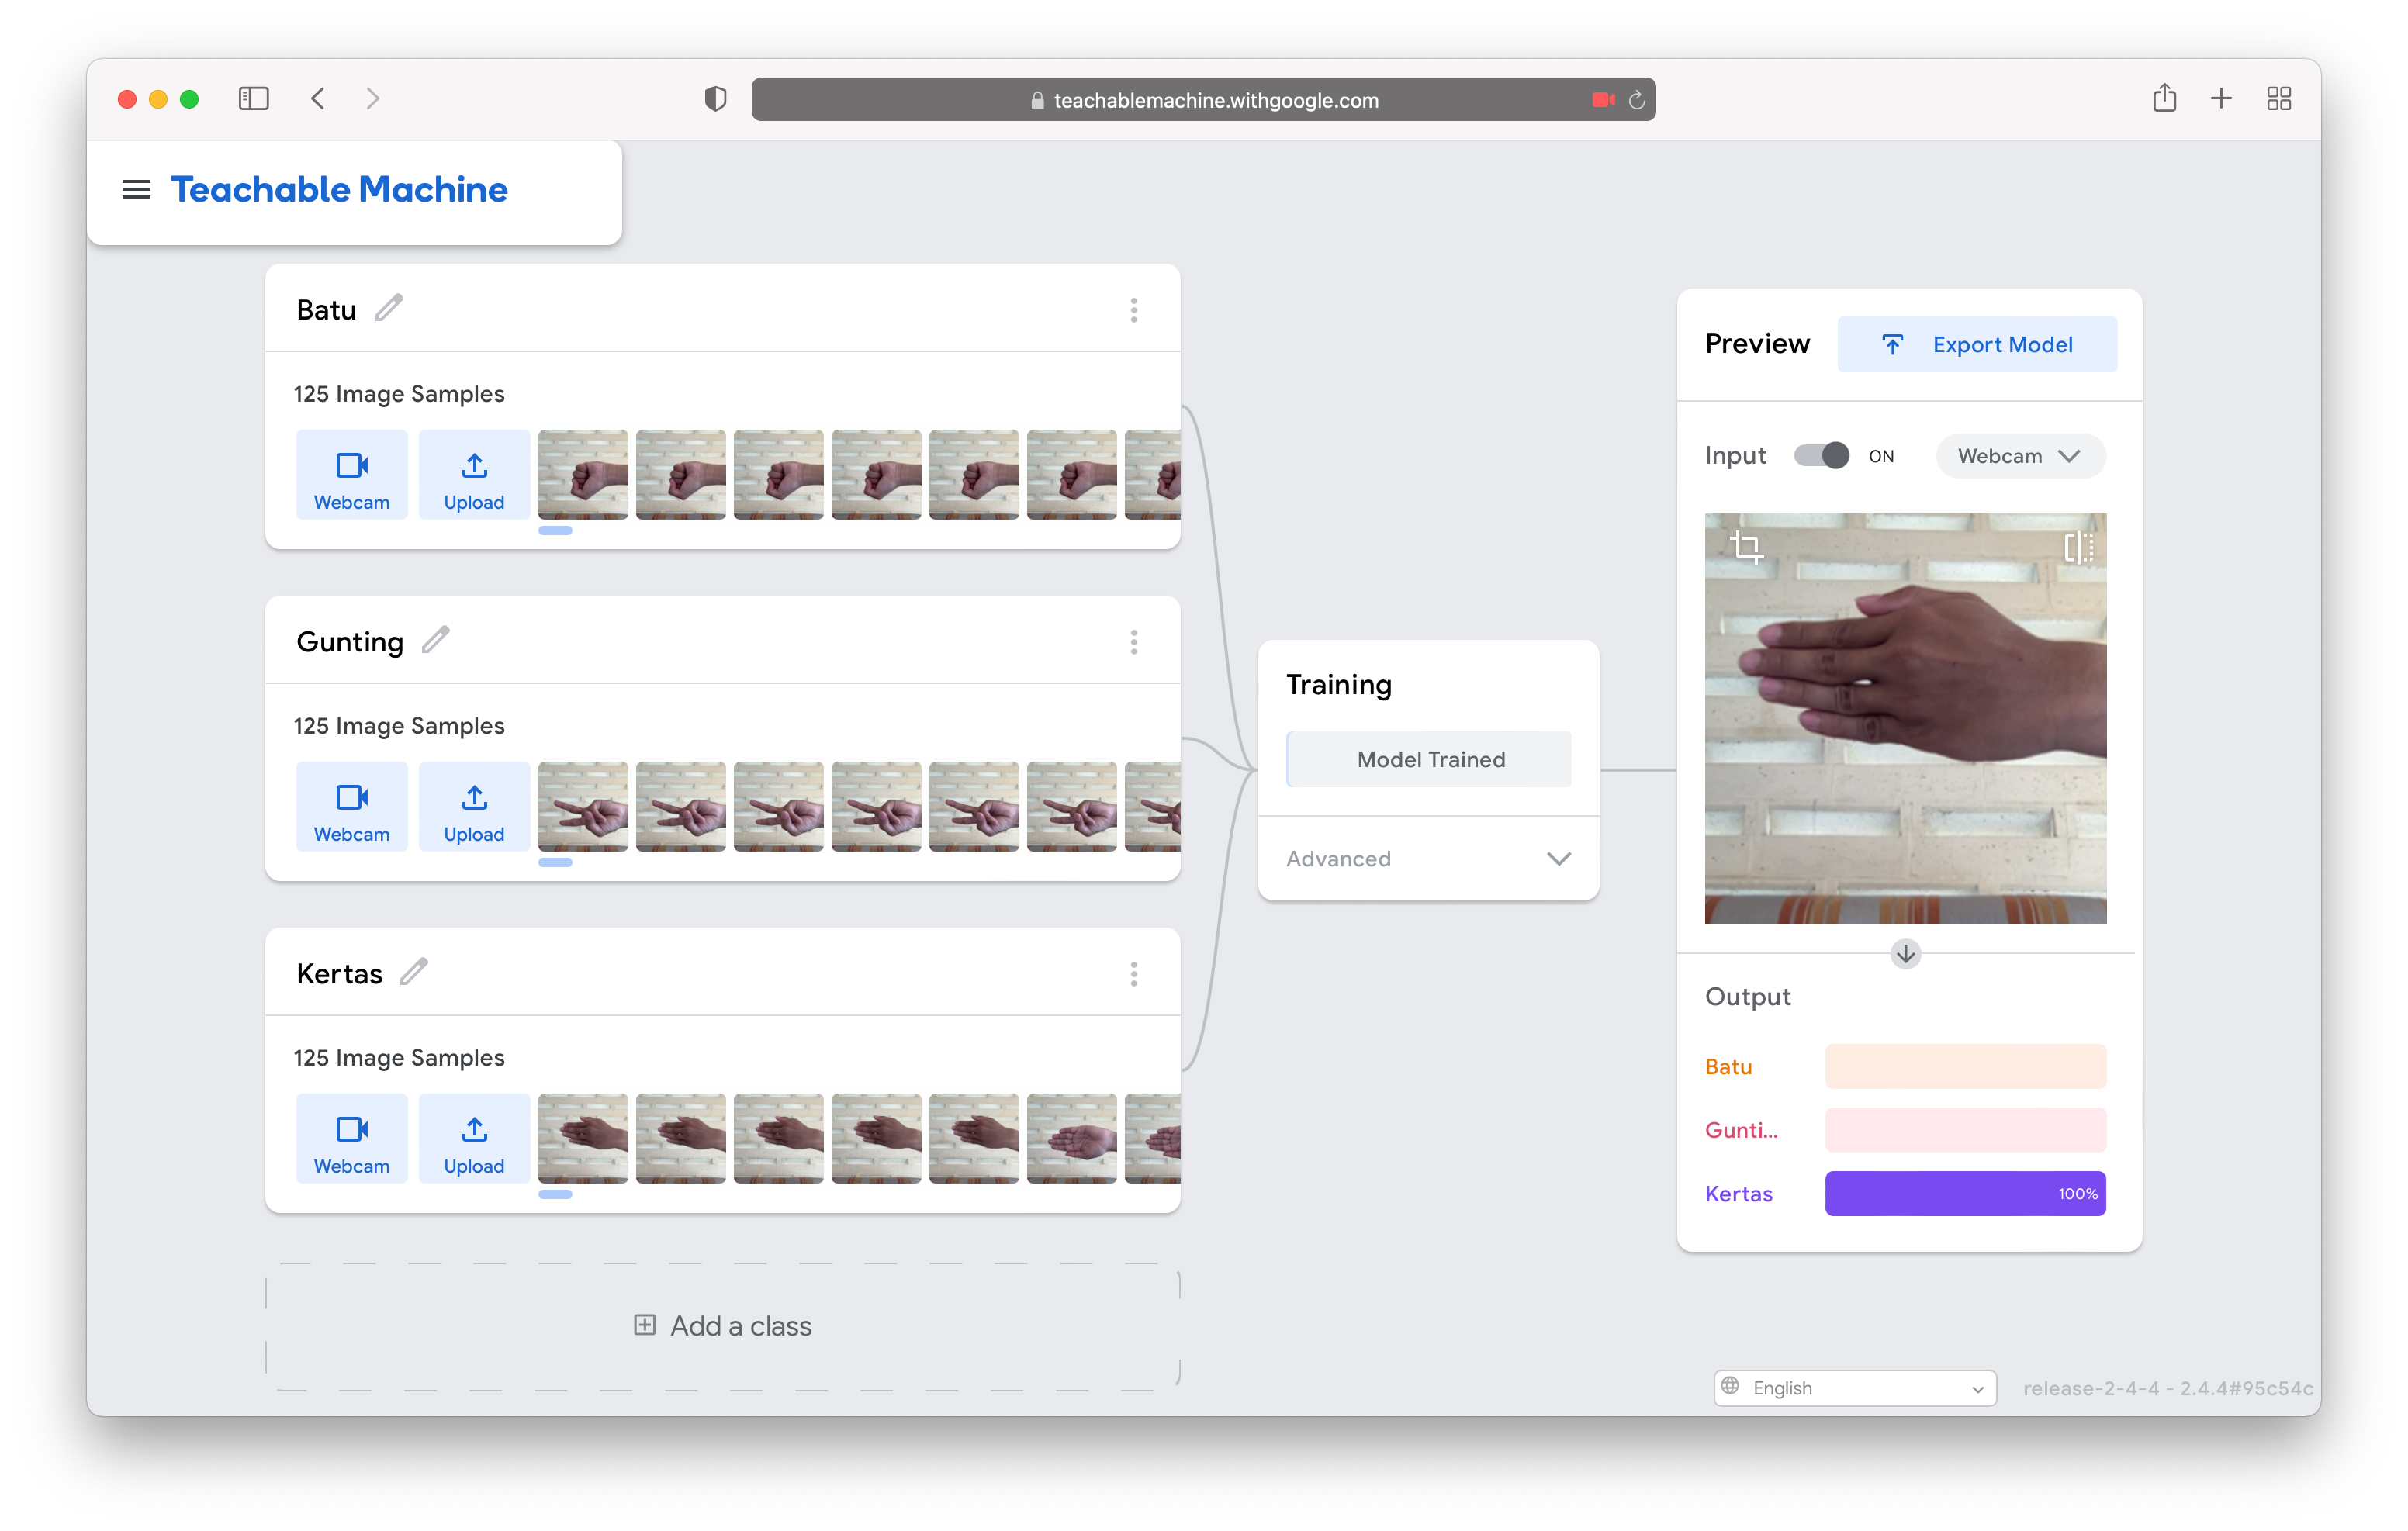
Project view
First we have to determine how many classes we will set, then we will fill in the image sample of each class.

We can directly fill in the image sample through the webcam, above is an example of a class and an image sample that is ready to be trained. For training model settings, you can use standard settings.
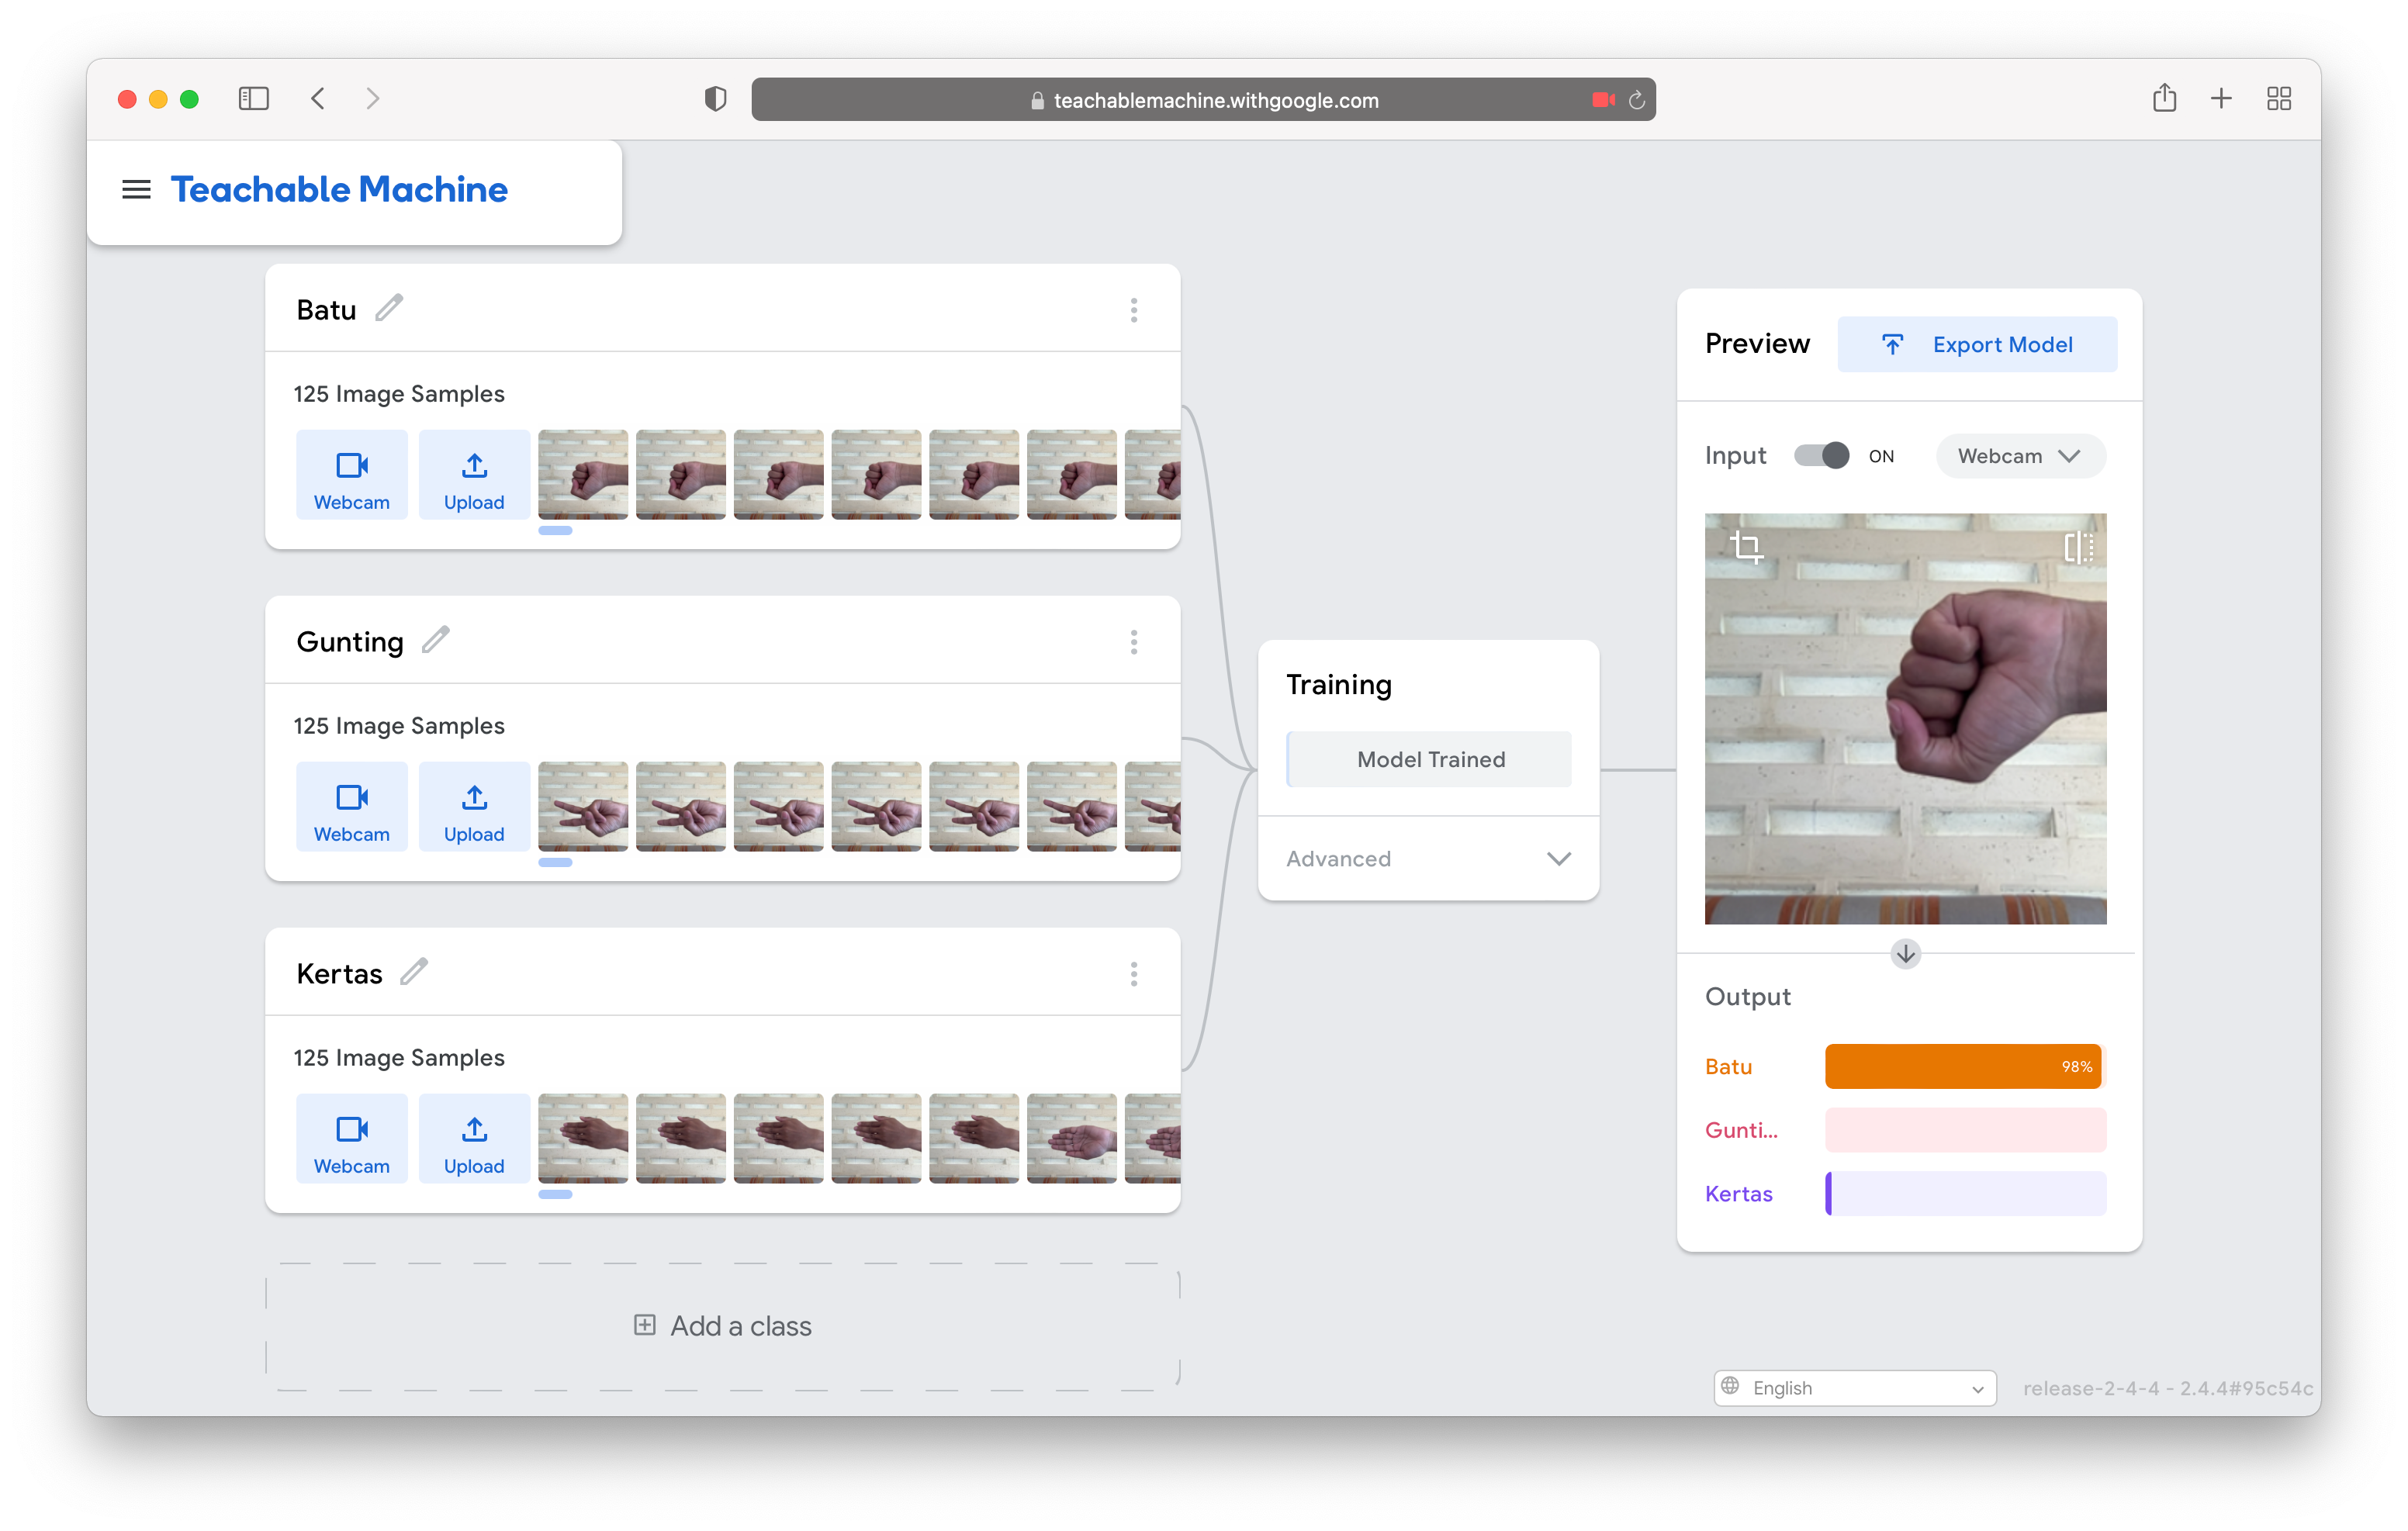
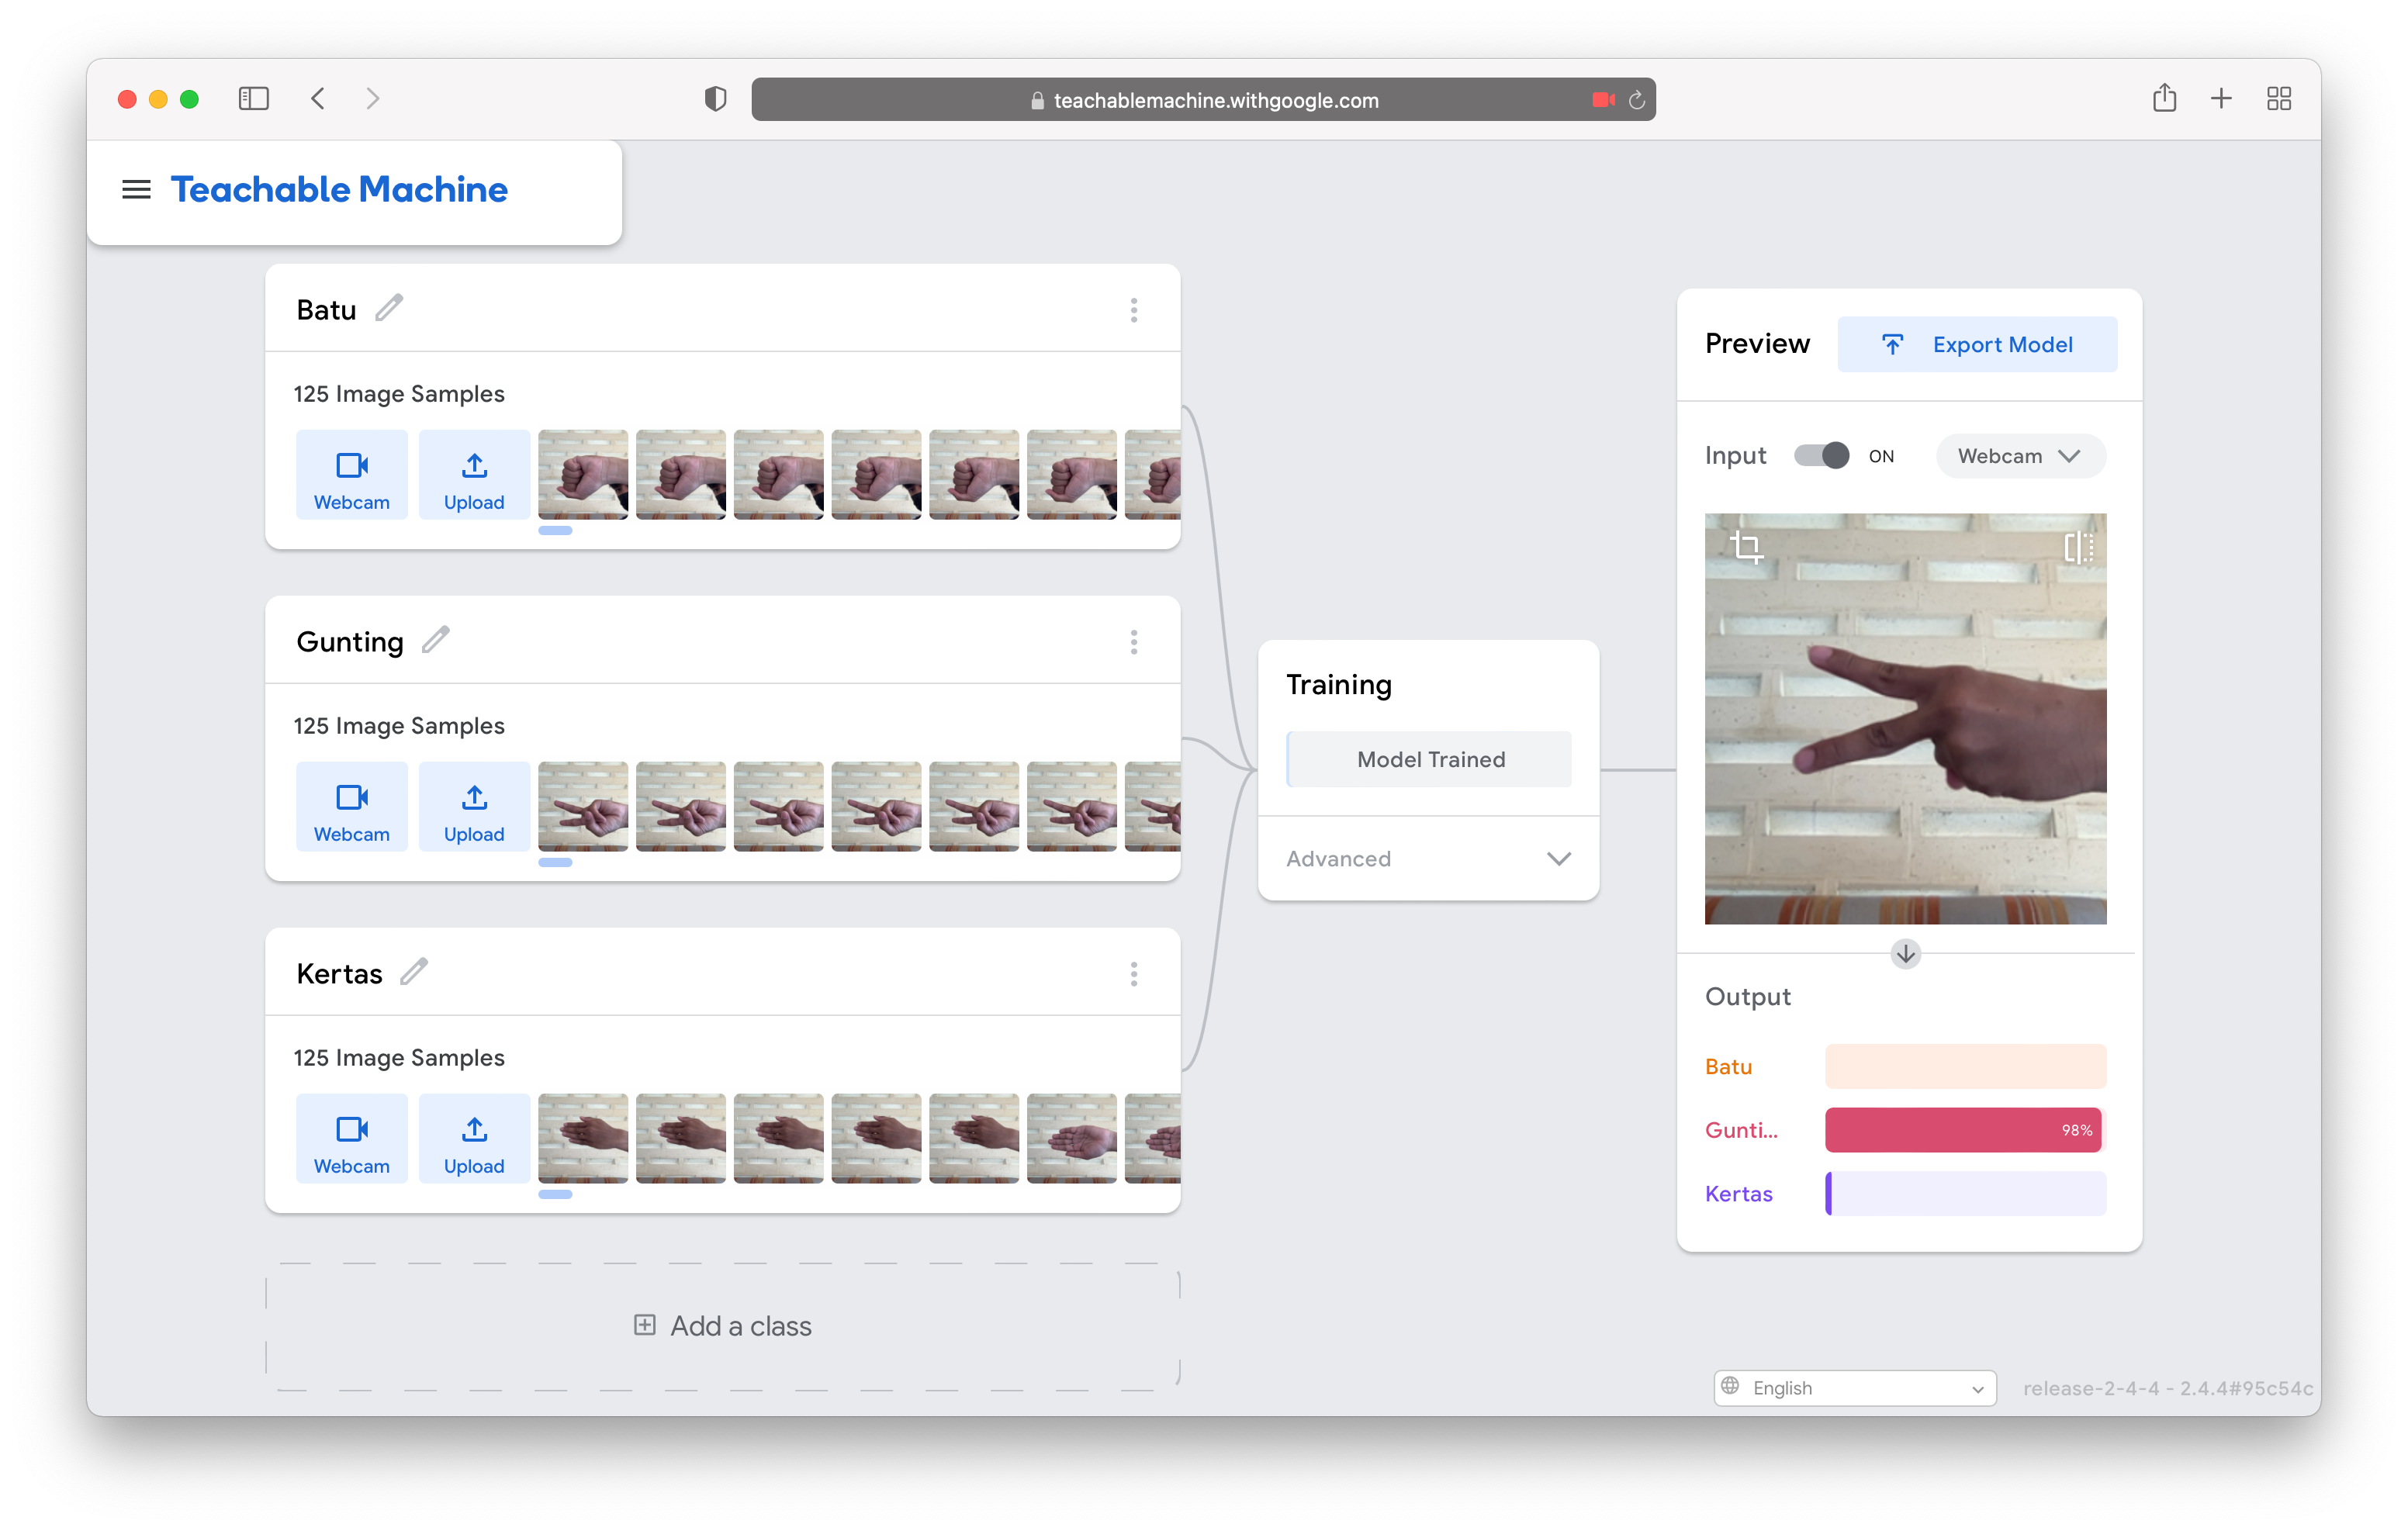
Training results when tested
If the training is over, we can immediately try it as shown above.
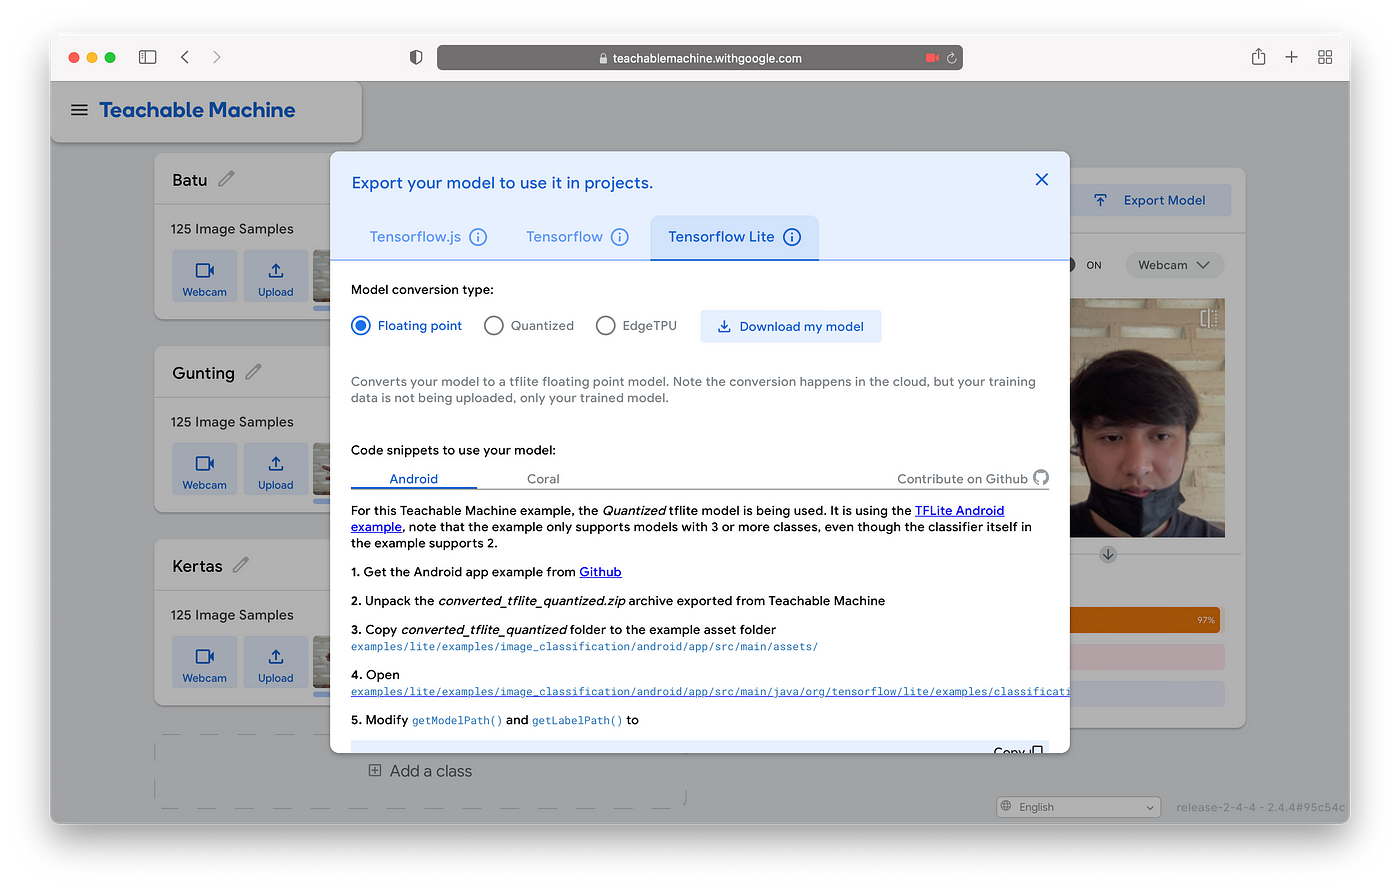
If the accuracy is considered good, the next process is to export the model to tensorflow lite.
The downloaded model will be in the form of a zip file and its contents are as below:


Creating a Flutter App
In this session, we will enter the model that we have created earlier into the flutter application.
First of all we have to create a flutter project then we create an asset folder and insert the model that we have downloaded as below:

After that we import the library tflite into the flutter project and register it in pubspec.yaml.

Then register the asset folder we created earlier to pubspec.yaml so that it can be called.

For the library call as below:

The full source code is below
import 'dart:io';

import 'package:flutter/material.dart';
import 'package:image_picker/image_picker.dart';
import 'package:tflite/tflite.dart';

class HomePage extends StatefulWidget {
  @override
  _HomePageState createState() => _HomePageState();
}

class _HomePageState extends State {
  var isLoading = false;
  File fileImage;
  final listOutputs = [];

  @override
  void initState() {
    isLoading = true;
    loadModel().then((value) {
      setState(() => isLoading = false);
    });
    super.initState();
  }

  @override
  Widget build(BuildContext context) {
    return Scaffold(
      appBar: AppBar(
        title: Text(
          'Flutter Image Classification',
        ),
      ),
      body: isLoading
          ? Center(
        child: CircularProgressIndicator(),
      )
          : Container(
        width: double.infinity,
        child: Column(
          crossAxisAlignment: CrossAxisAlignment.center,
          mainAxisAlignment: MainAxisAlignment.center,
          children: [
            fileImage == null ? Container() : Image.file(fileImage),
            SizedBox(height: 16),
            listOutputs.length > 0
                ? Text(
              '${listOutputs[0]['label']}'.replaceAll(RegExp(r'[0-9]'), ''),
              style: TextStyle(
                fontSize: 20,
                background: Paint()..color = Colors.white,
                fontWeight: FontWeight.bold,
              ),
            )
                : Text('Upload your image'),
          ],
        ),
      ),
      floatingActionButton: Column(
        mainAxisAlignment: MainAxisAlignment.end,
        children: [
          FloatingActionButton(
            child: Icon(Icons.camera),
            tooltip: 'Take Picture From Camera',
            onPressed: () => pickImage(ImageSource.camera),
          ),
          SizedBox(height: 16),
          FloatingActionButton(
            child: Icon(Icons.image),
            tooltip: 'Take Picture From Gallery',
            onPressed: () => pickImage(ImageSource.gallery),
          ),
        ],
      ),
    );
  }

  Future loadModel() async {
    await Tflite.loadModel(
        model: 'assets/tf/model_unquant.tflite',
        labels: 'assets/tf/labels.txt',
        numThreads: 1,
        useGpuDelegate: false
    );
  }

  void pickImage(ImageSource imageSource) async {
    var image = await ImagePicker().getImage(source: imageSource);
    if (image == null) {
      return null;
    }
    setState(() {
      isLoading = true;
      fileImage = File(image.path);
    });
    processImage(fileImage);
  }

  void processImage(File image) async {
    var output = await Tflite.runModelOnImage(
        path: image.path,
        numResults: 6,
        threshold: 0.05,
        imageMean: 0.0,
        imageStd: 255.0,
        asynch: true
    );
    setState(() {
      isLoading = false;
      listOutputs.clear();
      listOutputs.addAll(output);
      debugPrint('outputs: $listOutputs');
    });
  }
}
App Experiment
Once we've registered the tensorflow assets and libraries into the flutter application, we'll next try them out.
The results of the tests that I have run are as follows:


 Have any question?